Hallo, in this tutorial I’m gonna show you to create a Depth of Field using V-Ray Z-Depth. Depth of Field (DOF) is an image effect to make one main object on focus and the rest is blurred. DOF works according to Z, so Z distance is one of the important setting. There is another way to create this effect. The first one is creating it with V-Ray Camera and set up the F-stop (next tutorial, I'm gonna show you this). The result is more realistic but it takes more times to set and long time enough for rendering.
The easiest way to create this effect is using V-Ray Z-Depth and do a composition with Adobe Photoshop. In this way, you just need to render your scene and set up different distances for DOF. This method is really simple and save a lot of time to render. The result is also pretty good. So..as usually, let’s go to step 1.
1. Open your scene. In this tutorial, I use this blocks scene as an tutorial object.
Fig. 01
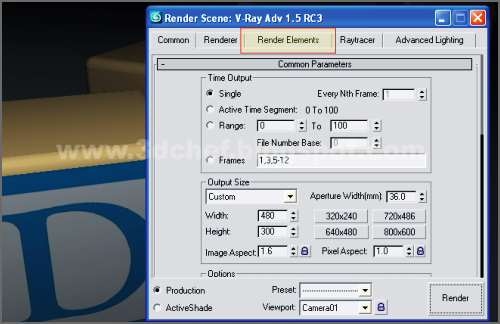
2. Go to perspective view. On ‘Rendering’ tabs, click ‘Render’ (or press F10). In ‘Render Scene’ panel, click ‘Render Element’.

Fig. 02
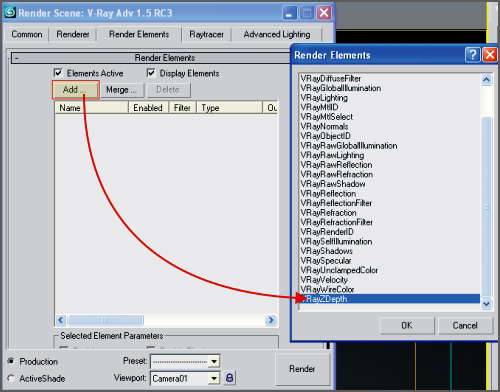
3. In ‘Render Element’ panel, click ‘Add’ and select ‘VRayZDepth’

Fig. 03
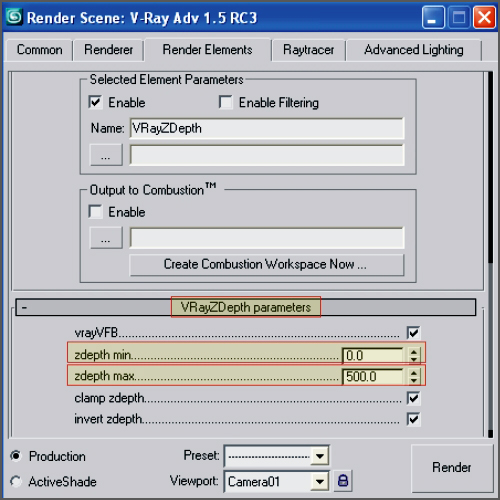
4. Still in ‘Render Element’ rollout, scroll down and click the ‘VrayZDepth Parameter’. Modify the two parameters (Zdepth min and Zdepth max) as you need for your scene, the 'Zdepth min' is the closest value and the 'Zdepth max' is the furthest value. The rest parameters is set by default. You might be doing some experiment to set up these parameters for the best DOF result on your scene.
Note : In my tutorial, I leave this all parameters by default.

Fig. 04
5. Now we’re done with the 'VRayZdepth' set up. Still in ‘Render Scene’ panel, hit ‘Render’. It’s gonna produces these two bitmaps. Now we have these two bitmaps. We’re gonna compositing these bitmaps in 'Photoshop'. See figure below.

Fig. 05
6. Continue to ==>>Part 2


0 comments